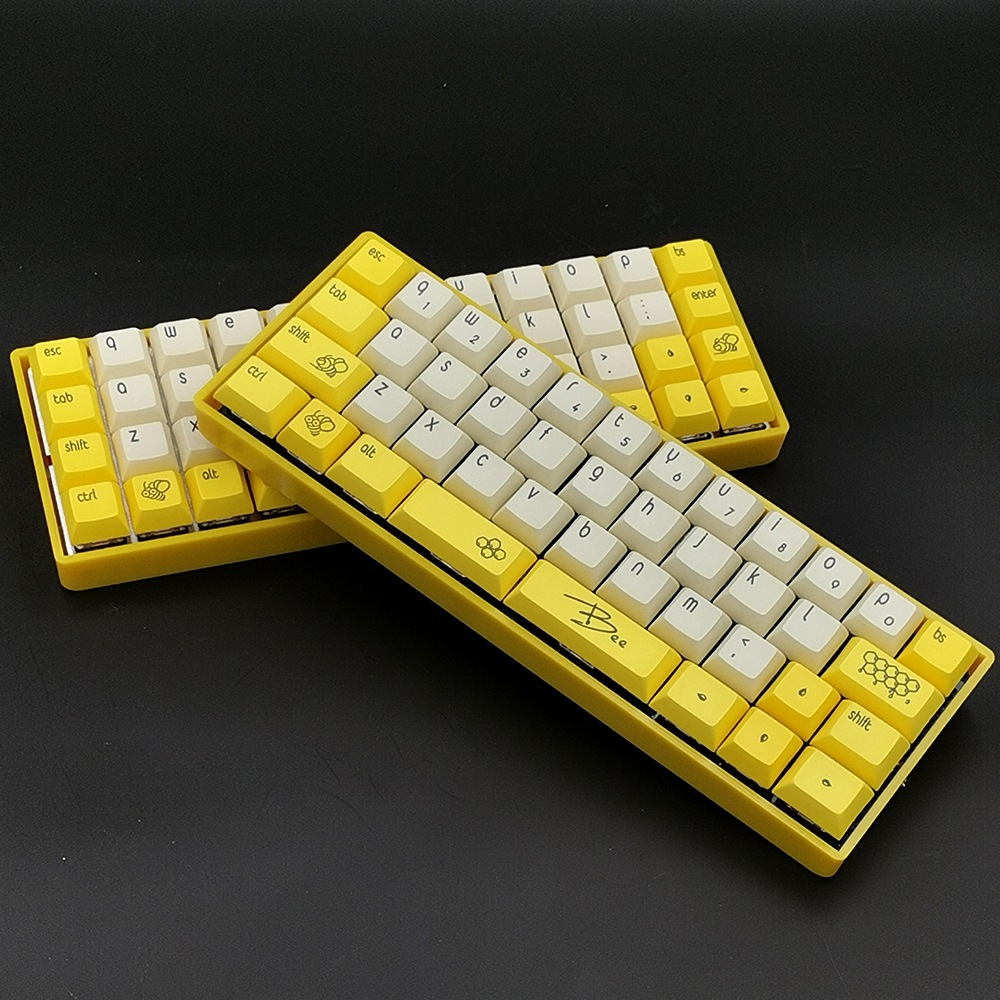
As a diehard ortholinear keyboard user with a proclivity for 40-something %s, I wanted to build this TU40 v3 keyboard that I saw on AliExpress. It’s a little different from what I’m used to in that the ortholinear version of the PCB supports only 2 x 2u spacebars, but I figure I can code up some stuff so it makes sense. The main draw of this keyboard is that it features 2.4 GHz connectivity, which is hard to find on a custom programmable keyboard, because the 2.4 GHz connectivity protocols are usually proprietary (as it remains even on this keyboard).
That being said, this keyboard doesn’t actually use QMK or some other common software for reprogramming keyboard firmware. Rather, it uses some free but proprietary software that is somewhat difficult to navigate. In my opinion, the software is clearly a wrapper around QMK. Instructions for navigating the software can be found on this GitBook, which is in Chinese, but fortunately, Google Translate has really improved. I’ll screenshoot the English translations onto this article, for ease of use.
Download and Launch the Driver
The GitBook link above links the software for reprogramming the keyboard. Links for both Mac and Windows-compatible software versions are shown, but as of May 26, 2022, only the Windows version appears to work (V2.7.3 WIN platform).
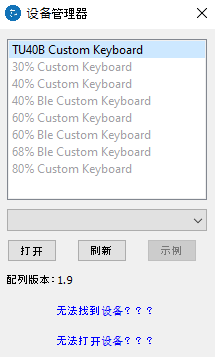
Plug in the keyboard and then start up the software. You should be greeted with a window like so:

.gif from the official GitBook that demonstrates the launch of the keymap programmer.
Modifying the Key Values
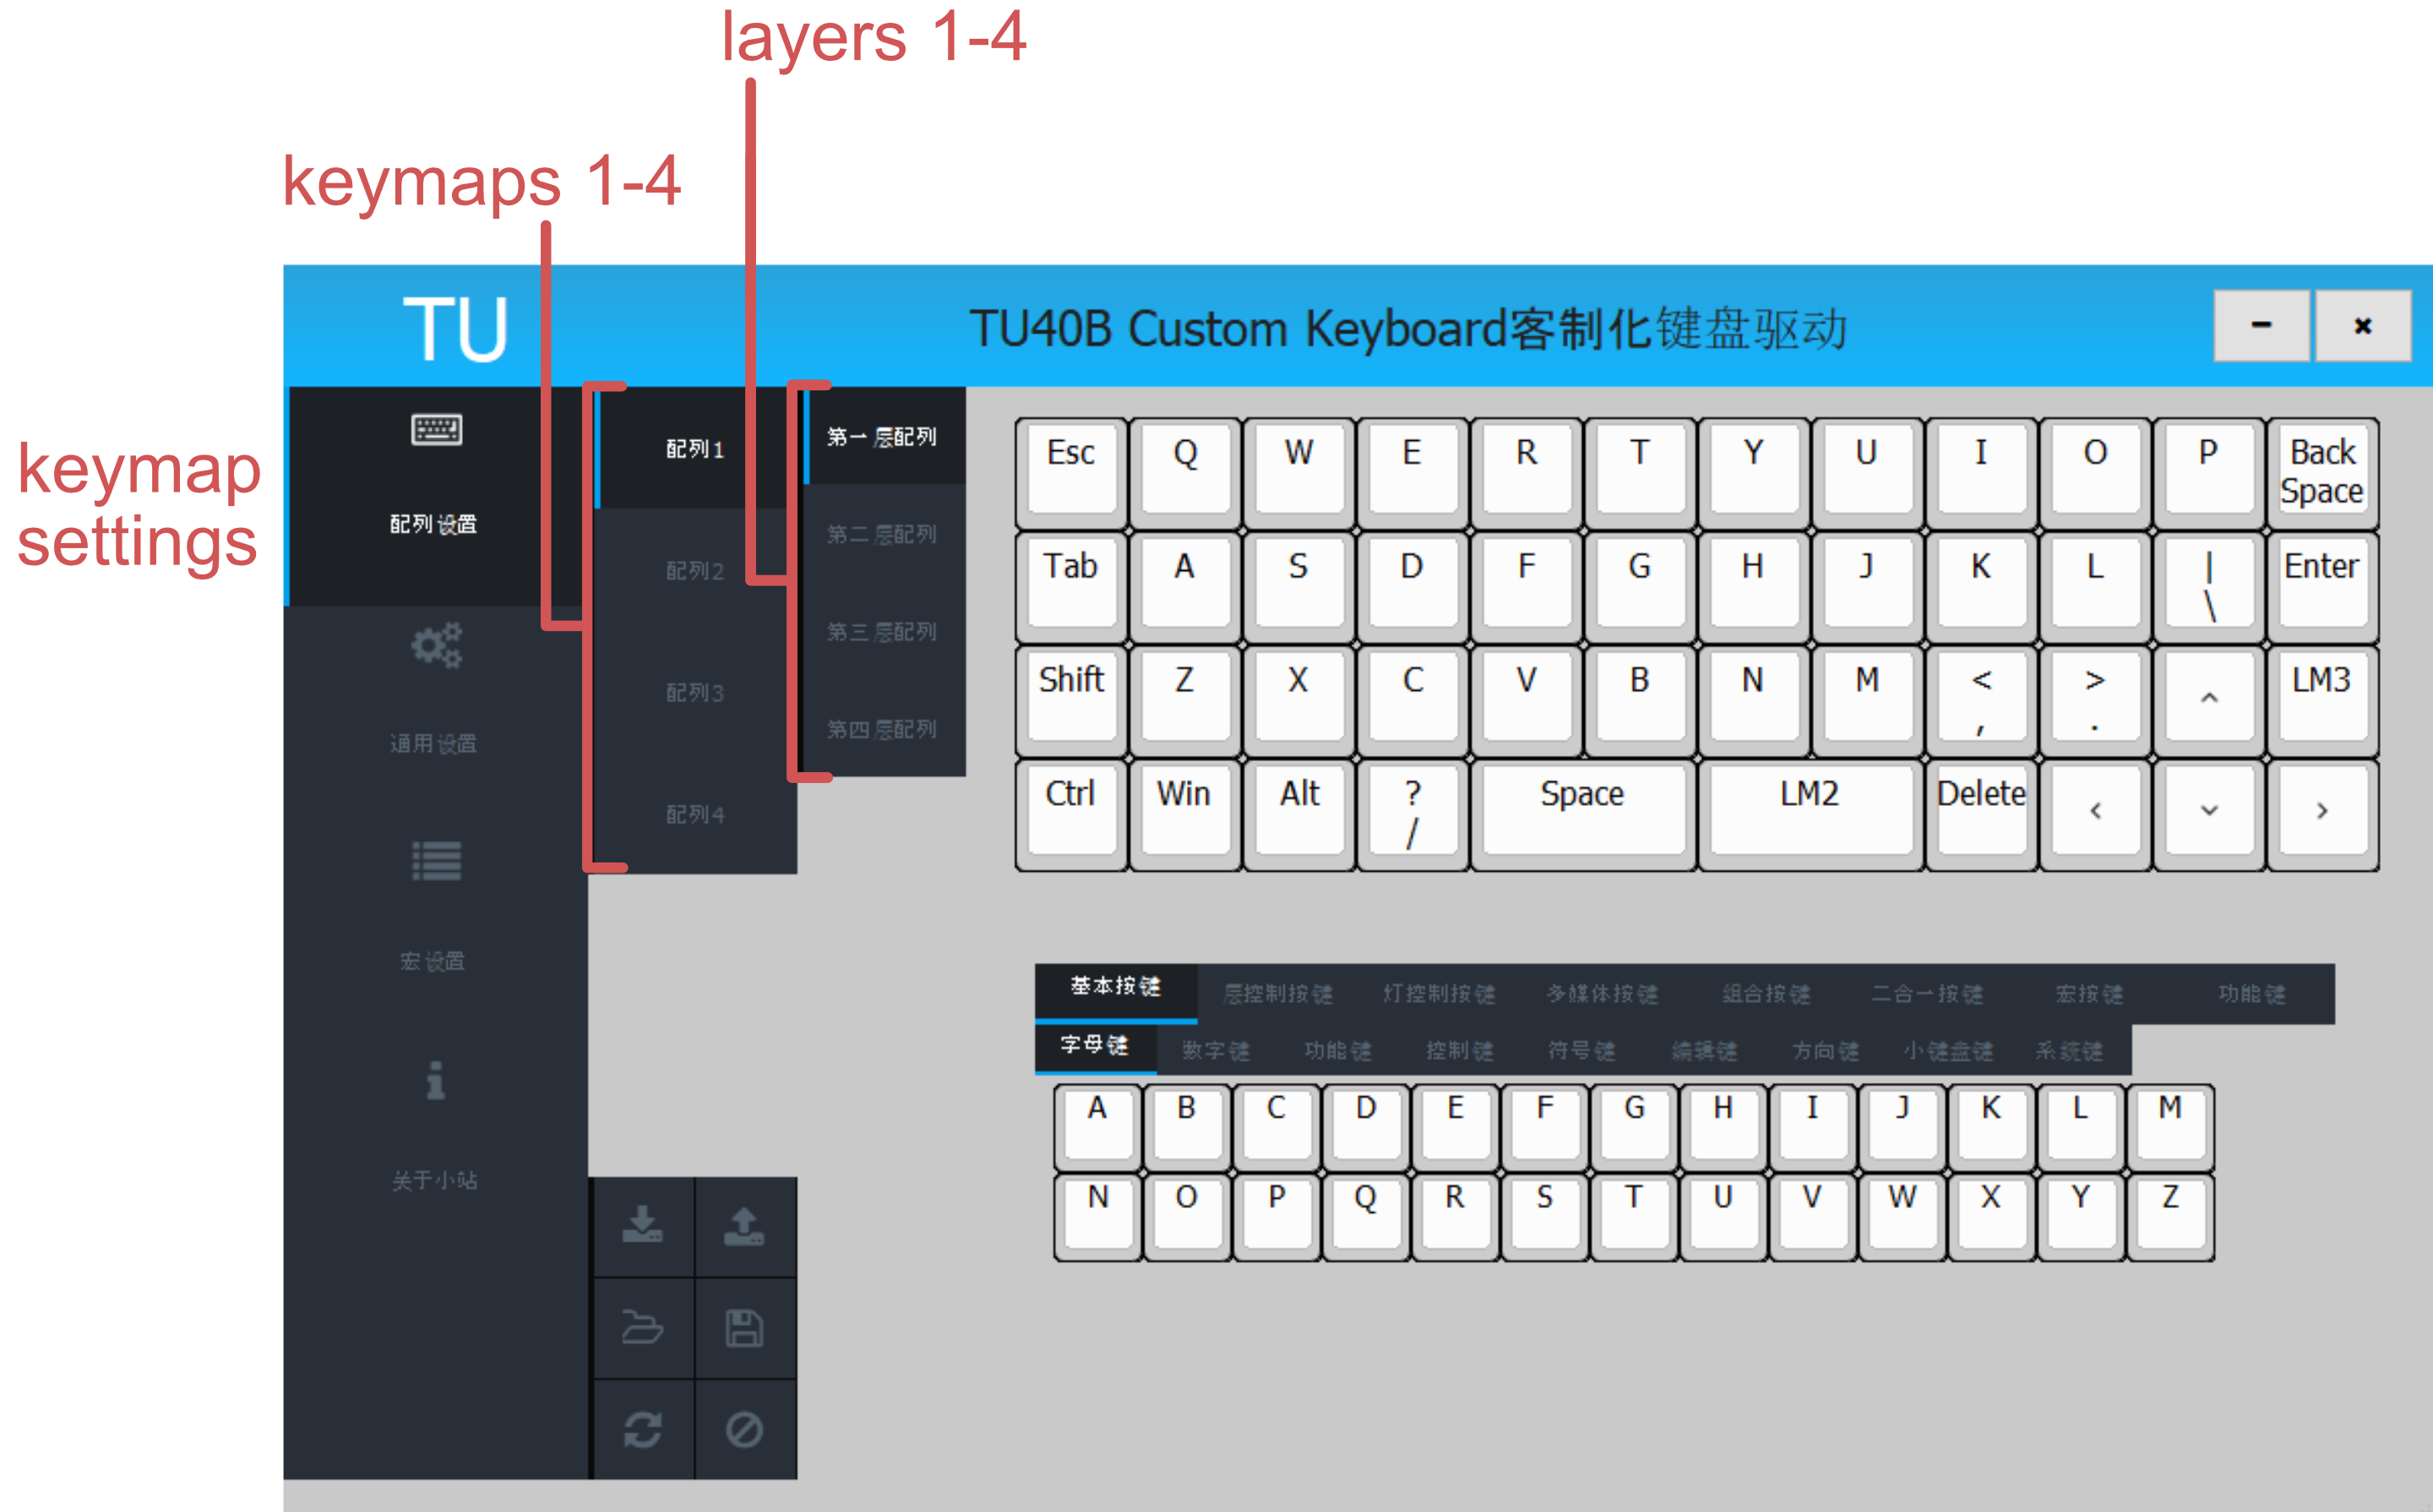
We can control the exact keymap of our keyboard. To do so, we simply need to select the key we are interested in modifying on the keyboard image, and then select the value we want to map that key to, from the below menu. The keymapping menu supports all sorts of things, and is divided up into 8 main categories:
- Basic Keys
- Layer Control
- Light Control Keys
- Multimedia Keys
- Combination Keys
- 2-in-1 Keys
- Macro Keys
- Function Keys
A key can have no value assigned if the 🚫 icon is selected.
The following images show all the various values that can be assigned to the keyboard’s keys:
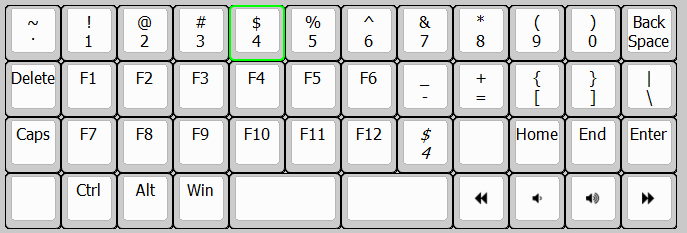
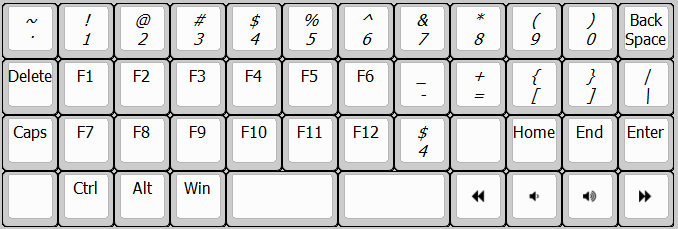
Basic Keys
![]()
Layer Control Keys
See Layer Control for more details.
![]()
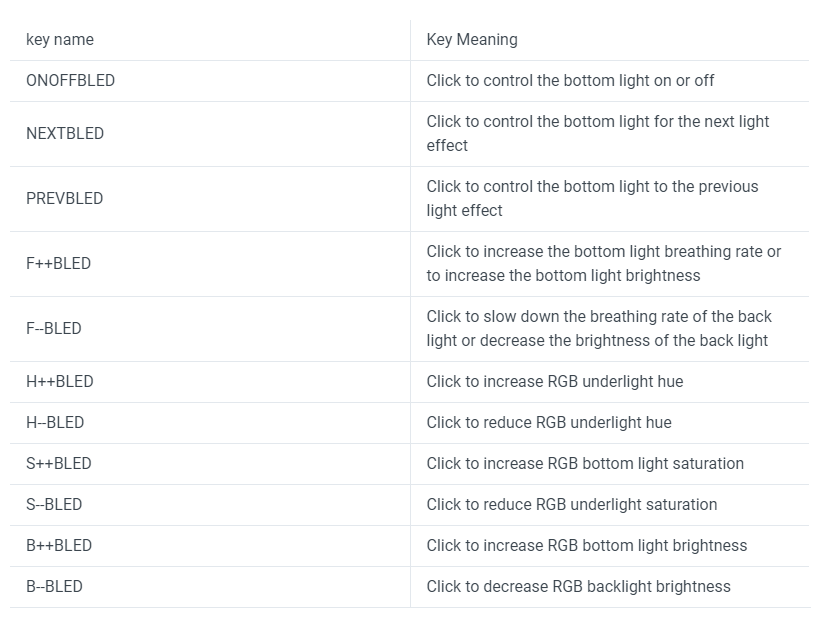
Light Control Keys
See Backlight for more information about backlight control.
![]()
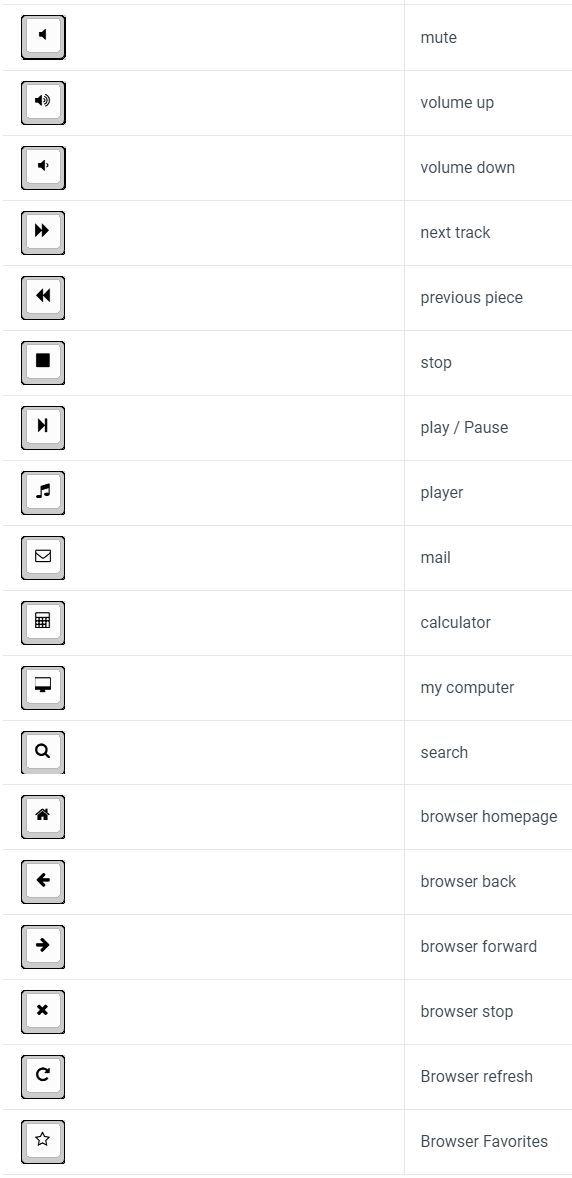
Multimedia Keys
![]()
Combination Keys
See Combination Keys for more details.
![]()
2-in-1 Keys
See 2-in-1 for more details.
![]()
Macro Keys
See Macro Keys for more details.
![]()
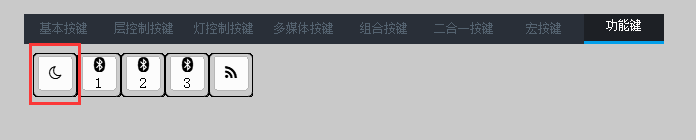
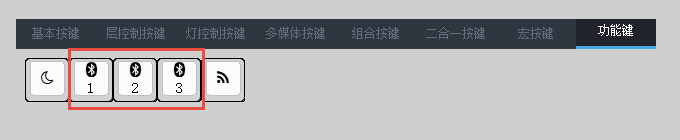
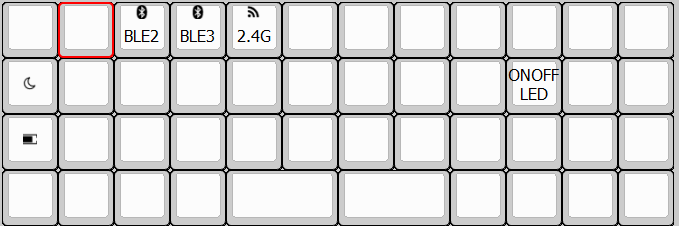
Function Keys
These keys are used to operate the wireless module. See the “Wireless” section for more details.
![]()
Some Other Basic Functions
The bottom left menu provides some key operations for working with the keymap:
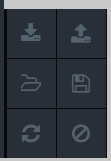
- The ⬇️ icon refers to “download” and it writes the current configuration to the keyboard.
- The ⬆️ icon refers to “upload” and it reads the configuration from the keyboard.
- The 📂 icon refers to “load” and it loads a a configuration from a local file.
- The 💾 icon refers to “save” and it saves the current configuration to a local file.
- The 🔄 icon refers to “restore” and it restores the selected layer to its default configuration.
- The 🚫 icon refers to “disable” and it disables the selected key.
Keymap and Layer Control
Keymap Control
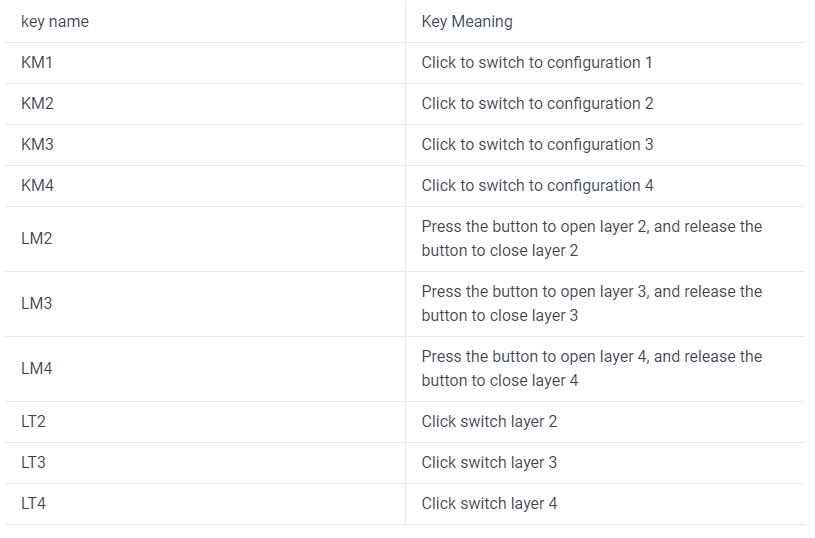
The TU40 can store up to 4 keymaps. These keymaps are not layers, but keymaps. That’s right, the TU40 can support 4 whole keymaps. One use case for storing multiple keymaps might be for working with different operating systems. Each keymap can encode 4 layers. A keymap can be accessed by KM_, where _ is the keymap number. So we can have a button load up keymap 2, by having it encode KM2. It’s a good idea to always have the ability to move to the other keymaps, when on any given keymap. We don’t want to be trapped on a particular keymap.
Layer Control
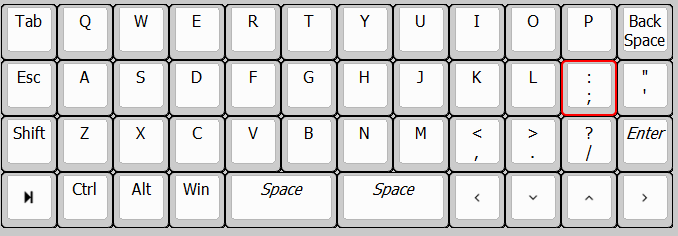
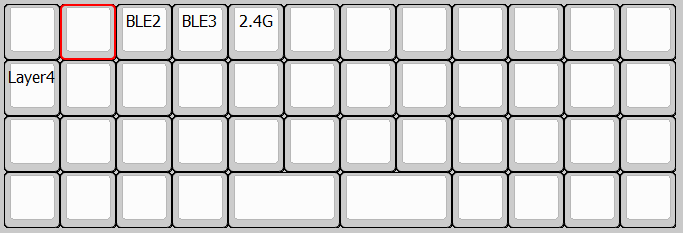
The TU40 can store up to 4 layers, for each keymap. Layer 1 is the bottom layer, and is the default layer. LM2 - LM4 activate the designated layer momentarily. They activate only while the key is held down. As soon as the the key is let go, the target layer is inactivated. If a key on the target layer does not a value assigned, then the key from the origin layer will simply be used instead. For example:
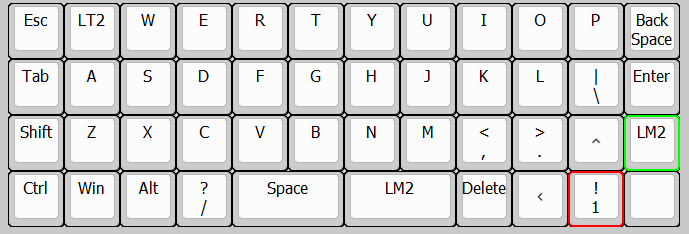
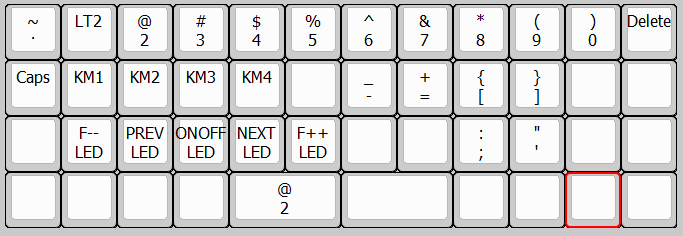
If we hit LM2 on Layer 1, as designated in green, and then select the valueless red key on Layer 2, then the corresponding key from the origin layer, Layer 1, will be activated instead. In this case, the output will be 1.
In contrast, the the LT2 - LT4 values toggle the designated layer. They activate the layer, until they are hit again. For example, if we are on layer 1 and we hit LT2, layer 2 will be activated. In order to get back to layer 1, we are going to have to hit LT2 again, provided that LT2 is on layer 2. In other words, we should always encode the origin layer at the target layer, or else, we will be stuck at the target layer.
![]() FYI
FYI ![]() : A simple trick to make sure you’re not stuck on a layer, after hitting_
: A simple trick to make sure you’re not stuck on a layer, after hitting_ LT_, is to make the target layer have no value assigned to the key that had the LT_ _value at the origin layer.
Key Combination
The combination key menu lets the user combine a target key with the keys that are next to the check boxes shown below:
For example, one can select the delete key, and then also check off LCtrl and LAlt to result in a key combination that is equivalent to ctrl + alt + delete. To enter a key combination do as demonstrated in the below .gif:
2-in-1 Key
The 2-in-1 key menu lets the user output different keys based on whether the user does a short or a long press. It’s equivalent to “tap-hold” from QMK.
A short press is defined as a keypress that’s released within 300 ms, where a long press is defined as a keypress that’s released not within 300 ms. Unfortunately, I can’t find a way of changing this parameter. In QMK, the tap-hold boundary is defined by TAPPING_TERM in the config.h.

Macro Keys
Macro keys can realize a series of key operations preset by one key output to improve input efficiency. They are set up across two menus:
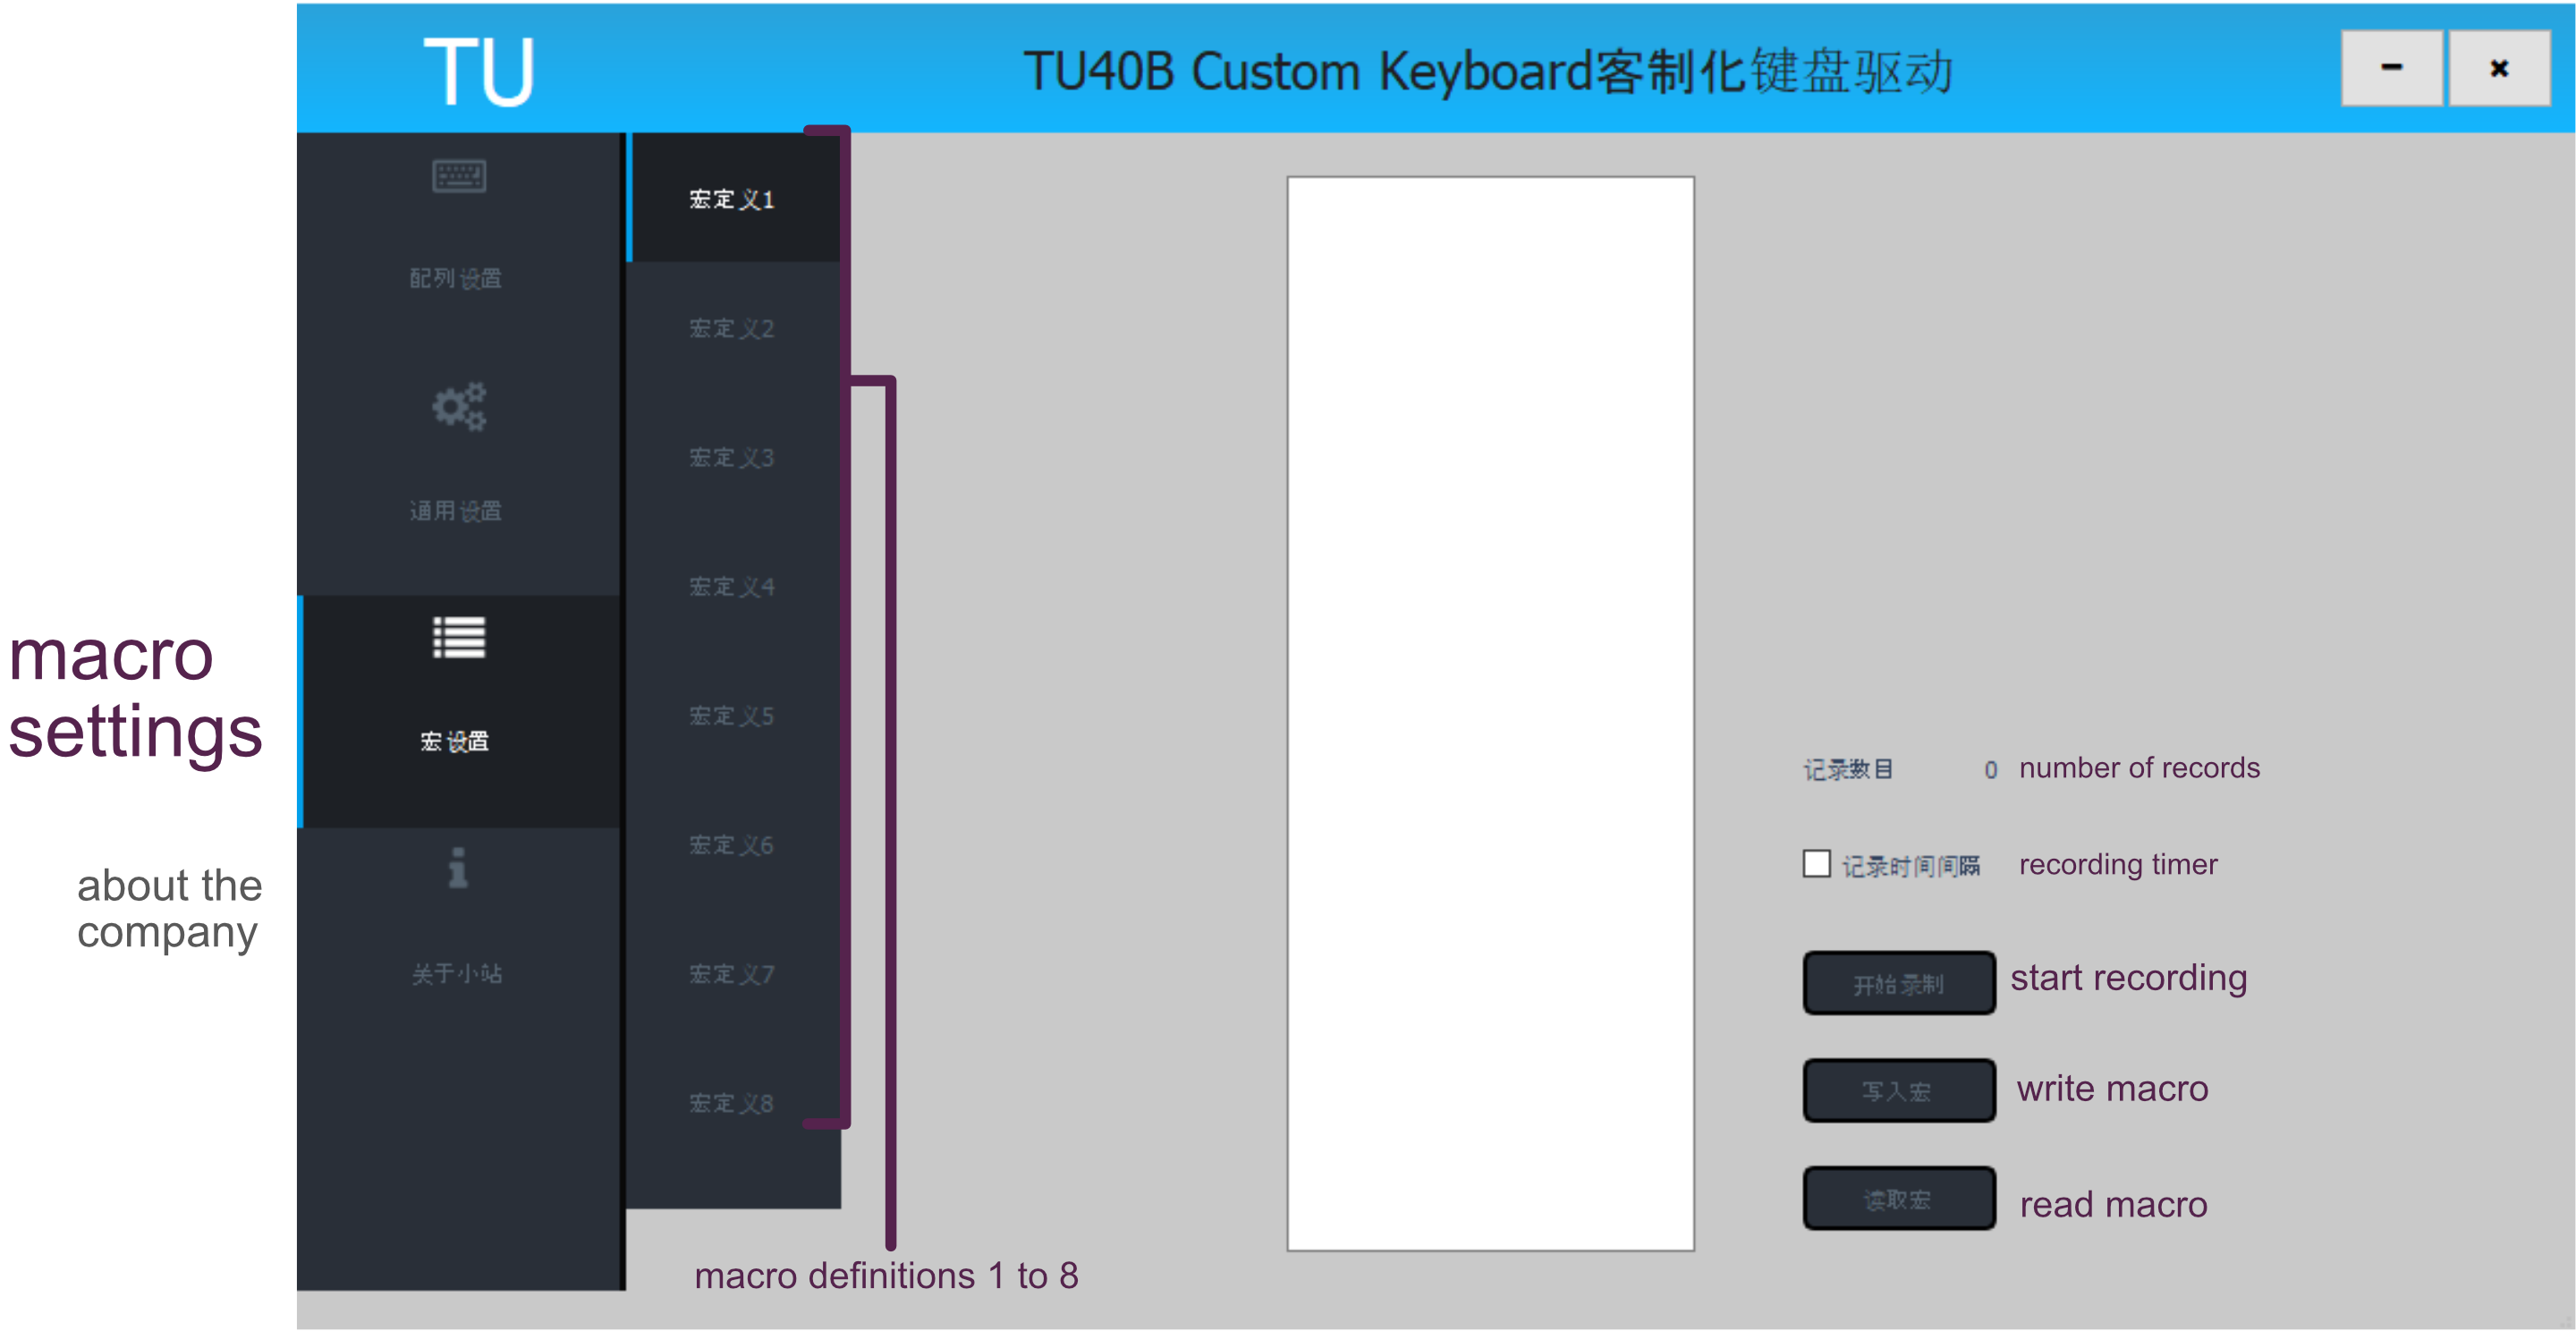
The TU40 can store up to 32 macro definitions, and each macro can support up to 120 actions. There are three types of macro actions: presses, releases, and delays.
To map a key with a a macro value, perform the same process as any key-value mapping process. E.g. select the key location and then select M_, e.g. M1 for macro 1.
To write a macro definition, switch to the macro definition menu. The macro definition menu gives us the option to record the actual times taken to perform the macro, via the “recording timer” checkbox. That is, it’ll record the delays between key presses. Otherwise, if the recording timer box is not ticked, it will record only the actual key presses and releases. To start recording the macro click the “start recording” button., and enter the preset key operation sequence on the keyboard. To stop recording the macro, click the “stop recording” button. Click the “write macro” button to write the recorded macro sequence to the previously selected macro value, e.g. M1.

Keyboard Updates
To manage the keyboard firmware version, or read the keyboard’s serial number, go to the “General Settings” page.
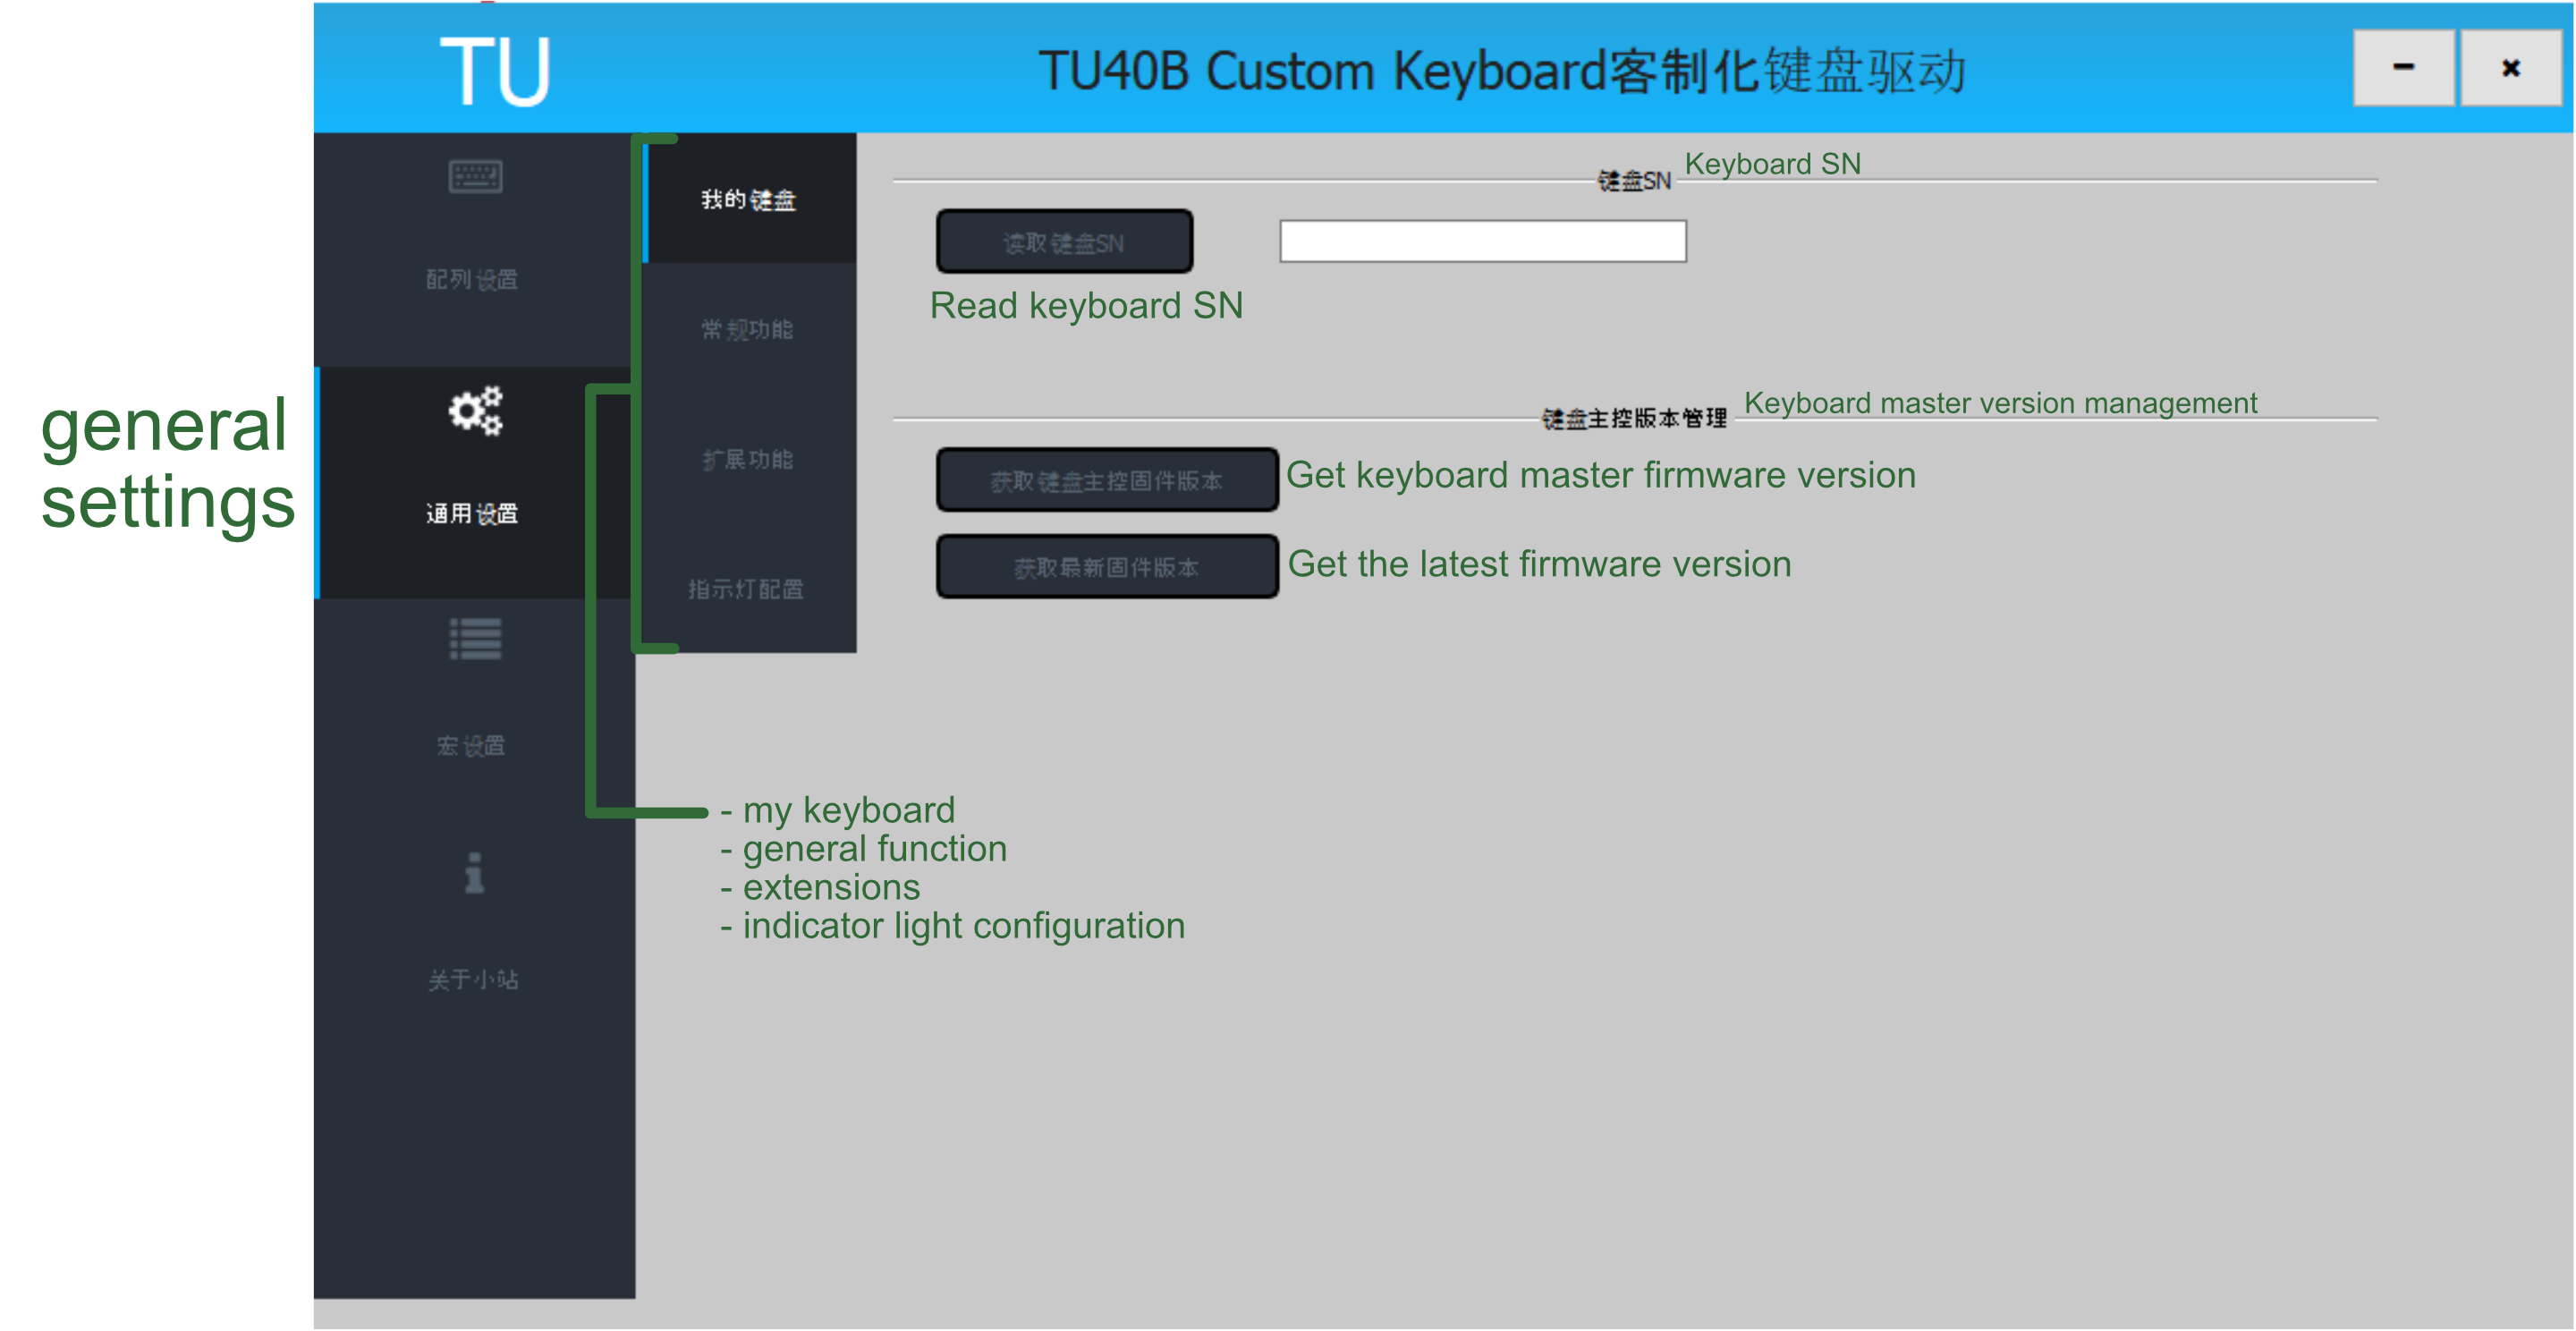
To get the factory serial number of the keyboard, click the “read keyboard SN” button. If the reading is successful, it’ll be displayed on the menu’s text box.
To get the keyboard’s current firmware version, click the “get keyboard master firmware version”. To update the keyboard’s firmware to the latest version, click the “get the latest firmware version” button.
General Functions
The keyboard has some additional ‘general’ settings.

6KRO vs NKRO
The keyboard can use one of the following key-press protocols:
- 6KRO: Is limited by the USB HID protocol, and supports the pressing of up to 6 keys and 4 modifier keys (
ctrl,alt,win,shift). - NKRO: uses a non-standard USB HID protocol to output all pressed keys. This mode is not compatible with some BIOS systems.
Select the Read button on the left hand side to figure out whether the keyboard is using 6KRO or NKRO. The result will show up in green on the left hand corner. To write the desired mode, select the mode of choice and then hit the Set up button to the left. The keyboard must then restart. If the keyboard is wired, simply re-plug and unplug the USB cable. If the keyboard is in wireless mode, press the switch on the PCB to turn the keyboard off, and then press the switch again to turn it back on.
Sleep
The TU40 has an automatic sleep function, in order to reduce the keyboard’s power consumption. We can set the time, in seconds, that must pass before the keyboard falls asleep. By default, the inactivity time before sleeping is 180 s.
You can also specify what will trigger the keyboard to wake up. Either a single ESC press, or any key press can wake up the keyboard from sleep mode. Hit Read under the “Wake up mode” heading to figure out what currently triggers the keyboard to wake. Hit Set up under the “Wake up mode” heading to write the method that triggers the keyboard to wake.
The TU40 also has a button that will automatically make the keyboard fall asleep:
Indicator Lights
We can assign which state will activate an indicator light. There are only 5 indicator lights on this keyboard.
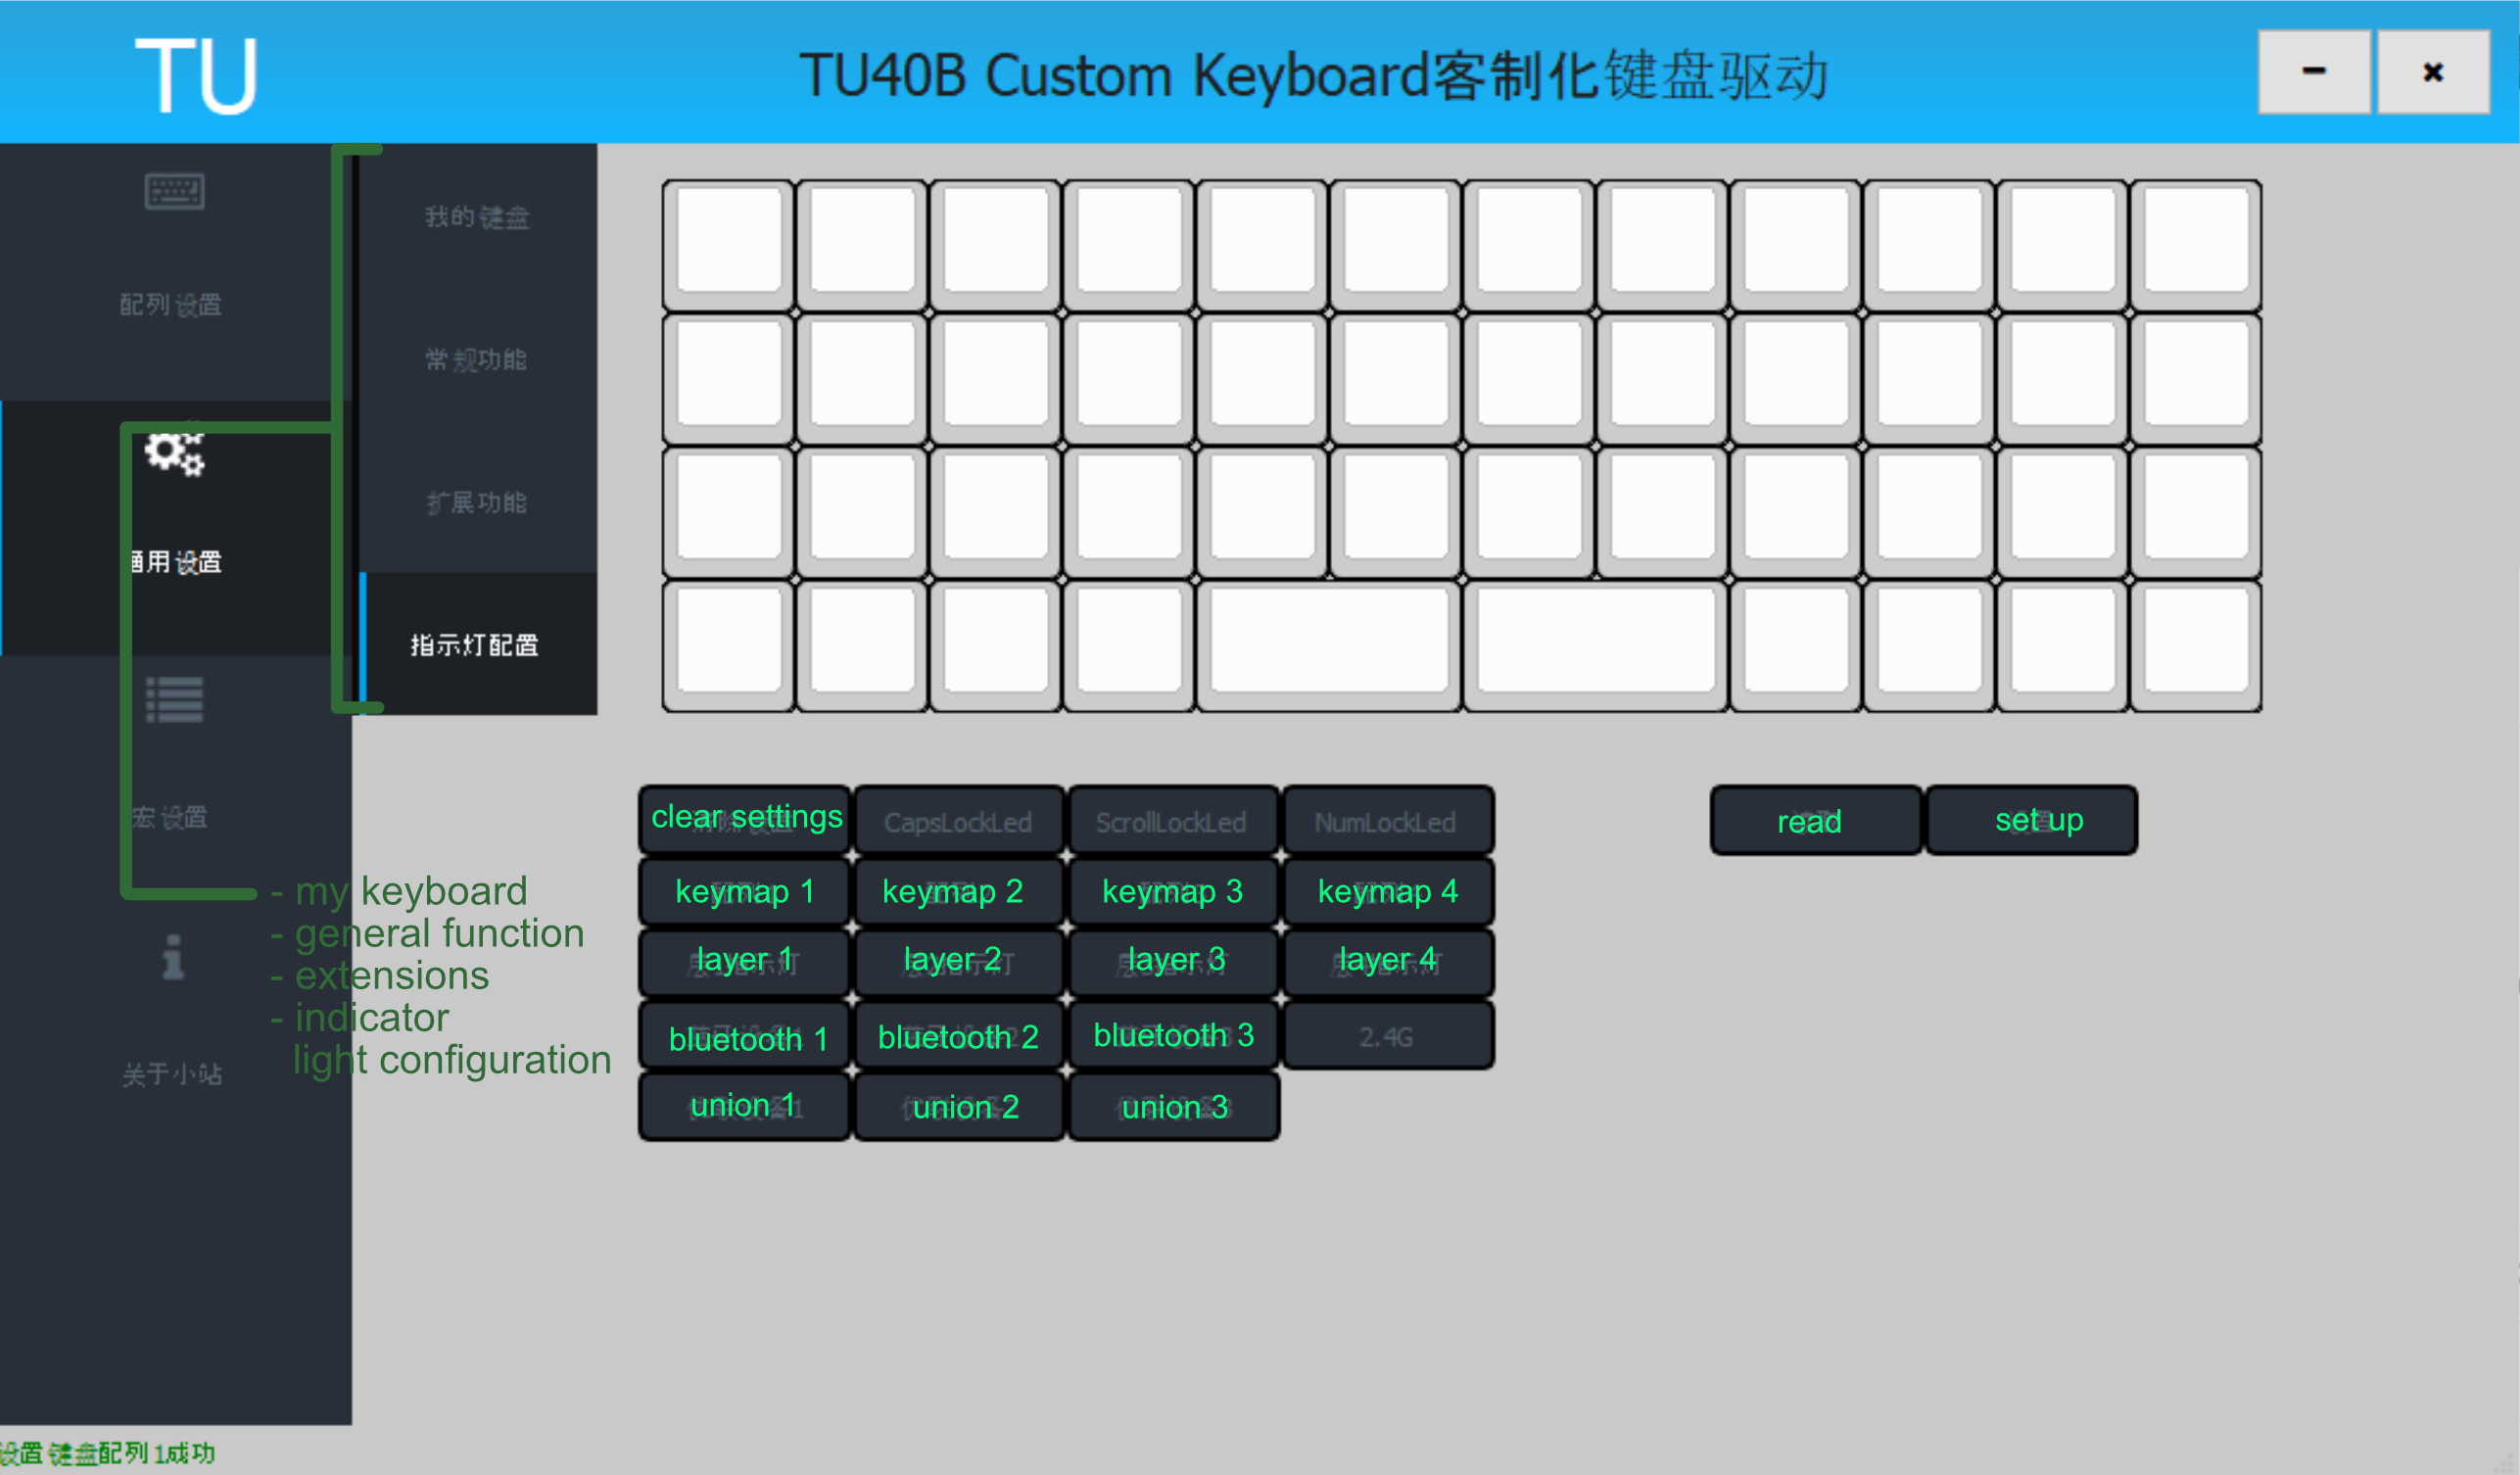

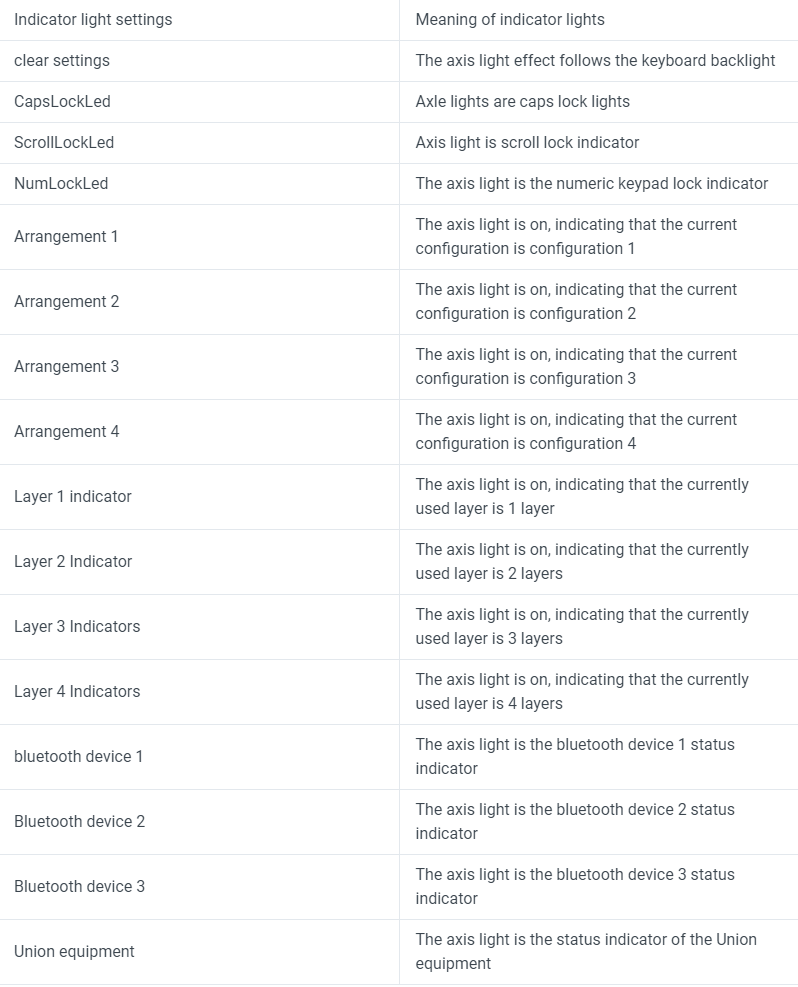
To map an indicator light’s state to a key’s LED, simply select the key, the desired state for representation, and then hit the set up button.

Conversely, we can also read the keyboard’s current indicator light configuration. We just need hit the read button.
Backlight
The TU40 backlight is monochrome and supports three light modes:
- Always on: Supports 5 levels of brightness
- Breathing: Supports 3 levels of breathing rates
- Button: This mode has two sub-modes: a) the more the button mode is hit, the brighter the keyboard becomes; b) the more the button is hit, the dimmer the keyboard becomes.
A more detailed table below shows the function of each light-related key value when in a given mode:
| key value | disabled | alwayys on mode | breathing pattern mode | button mode |
|---|---|---|---|---|
ONOFFLED |
Turn on the backlight | Turn off the backlight | Turn off the backlight | Turn off the backlight |
NEXTLED |
- | Switch to breathing mode | Switch to key mode | - |
PREVLED |
- | - | Switch to always on mode | Switch to breathing mode |
F++LED |
- | Increase brightness | Breathe faster | Toggle get brighter submode |
F--LED |
- | Reduce brightness | Slow down breathing | Toggle get brighter submode |
H++LED |
- | - | - | - |
H--LED |
- | - | - | - |
S++LED |
- | - | - | - |
S--LED |
- | - | - | - |
B++LED |
- | - | - | - |
B--LED |
- | - | - | - |
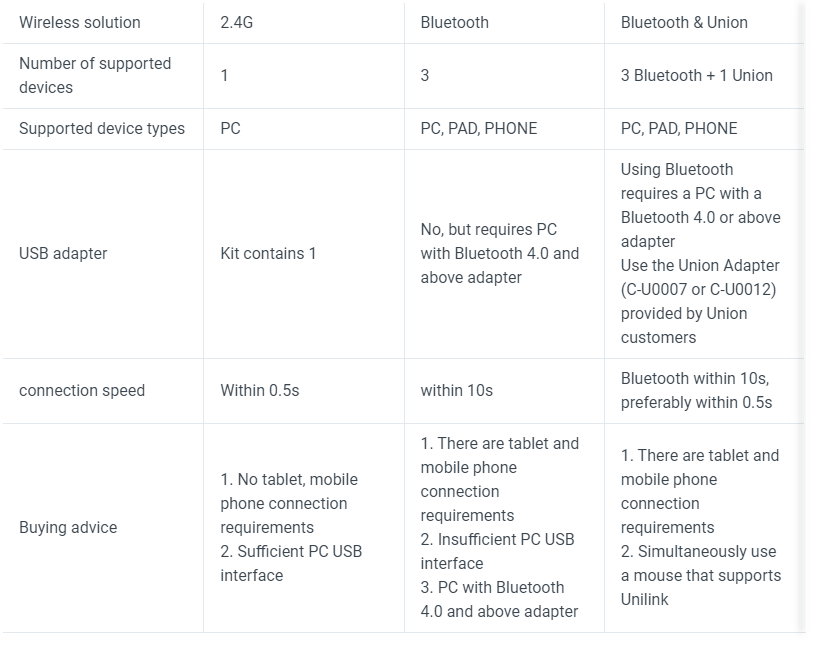
Wireless
The TU40 has up to three different wireless modes: 2.4 GHz, Bluetooth, and Unifying Bluetooth.
The supporting wireless modules have been installed on the PCB from the factory. These modules are shown below:
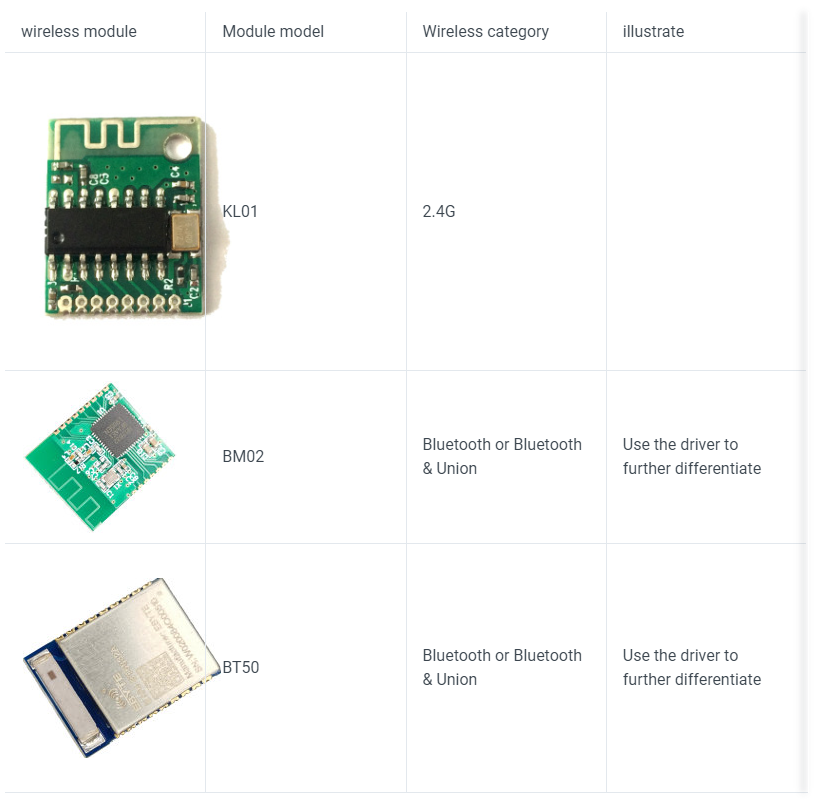
To figure out which wireless modes are being used, click the read permission button for the wireless mode of interest.
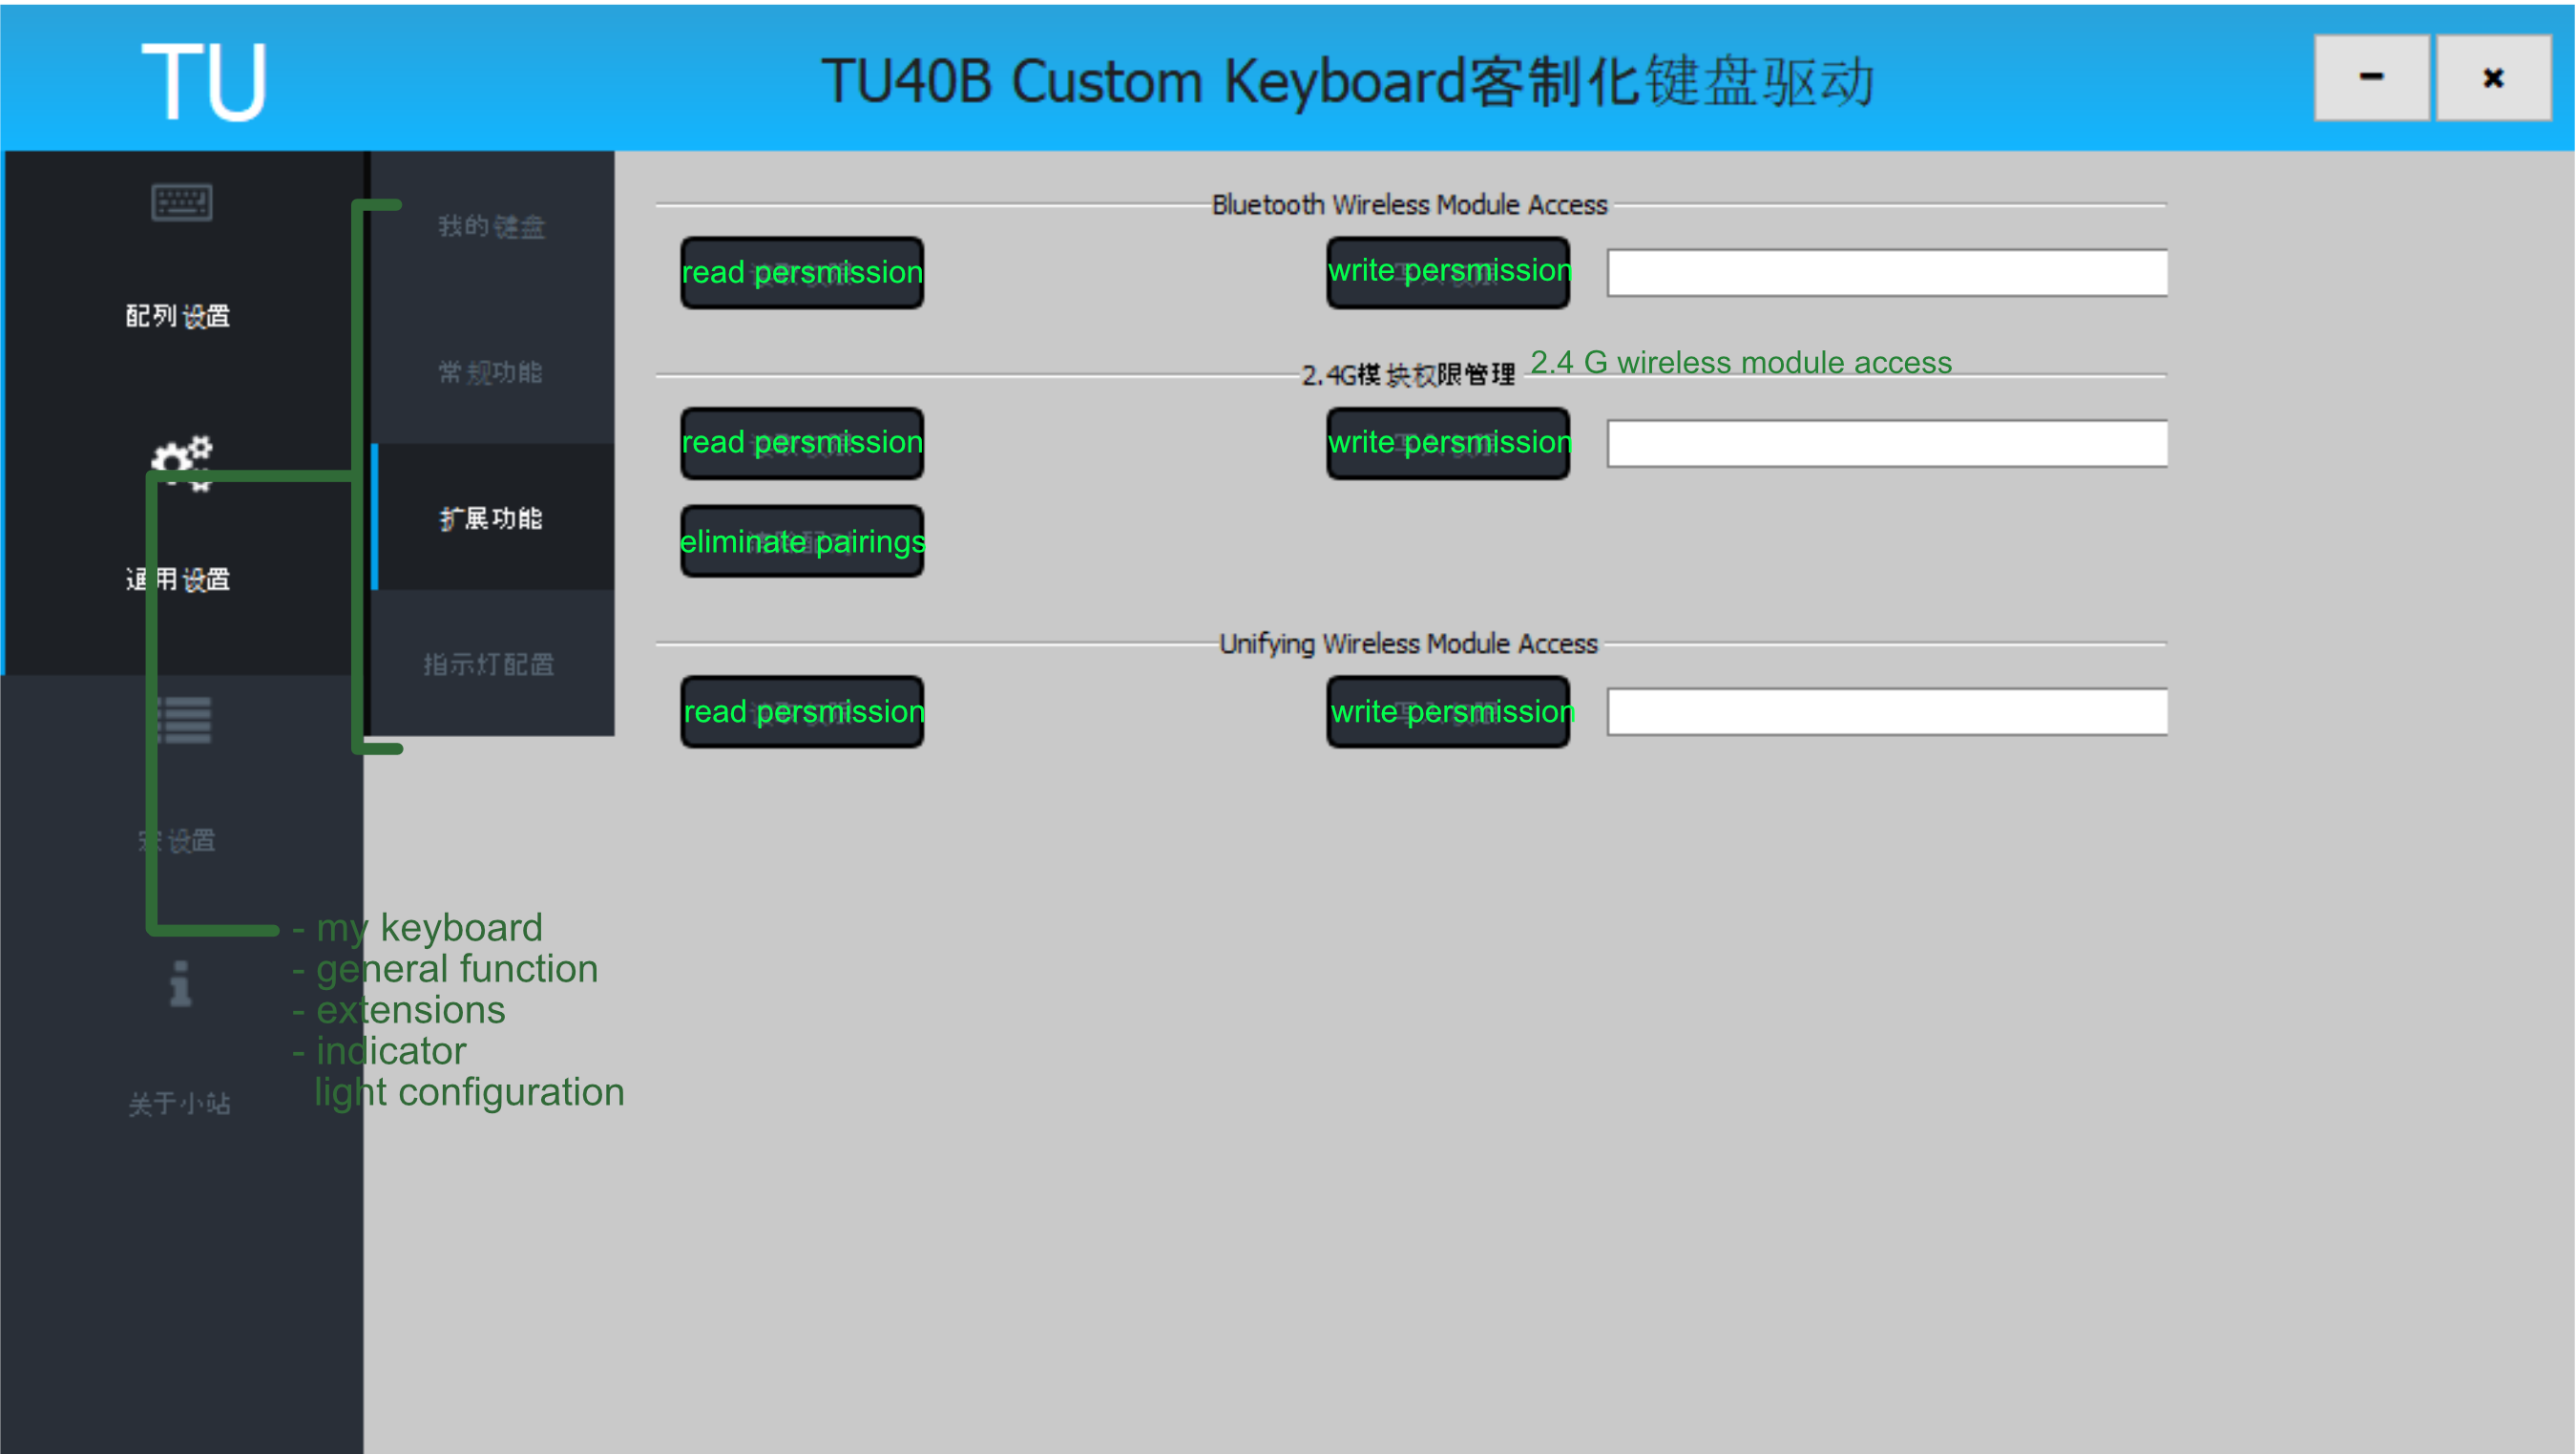
I am unclear about what the write permission buttons mean.
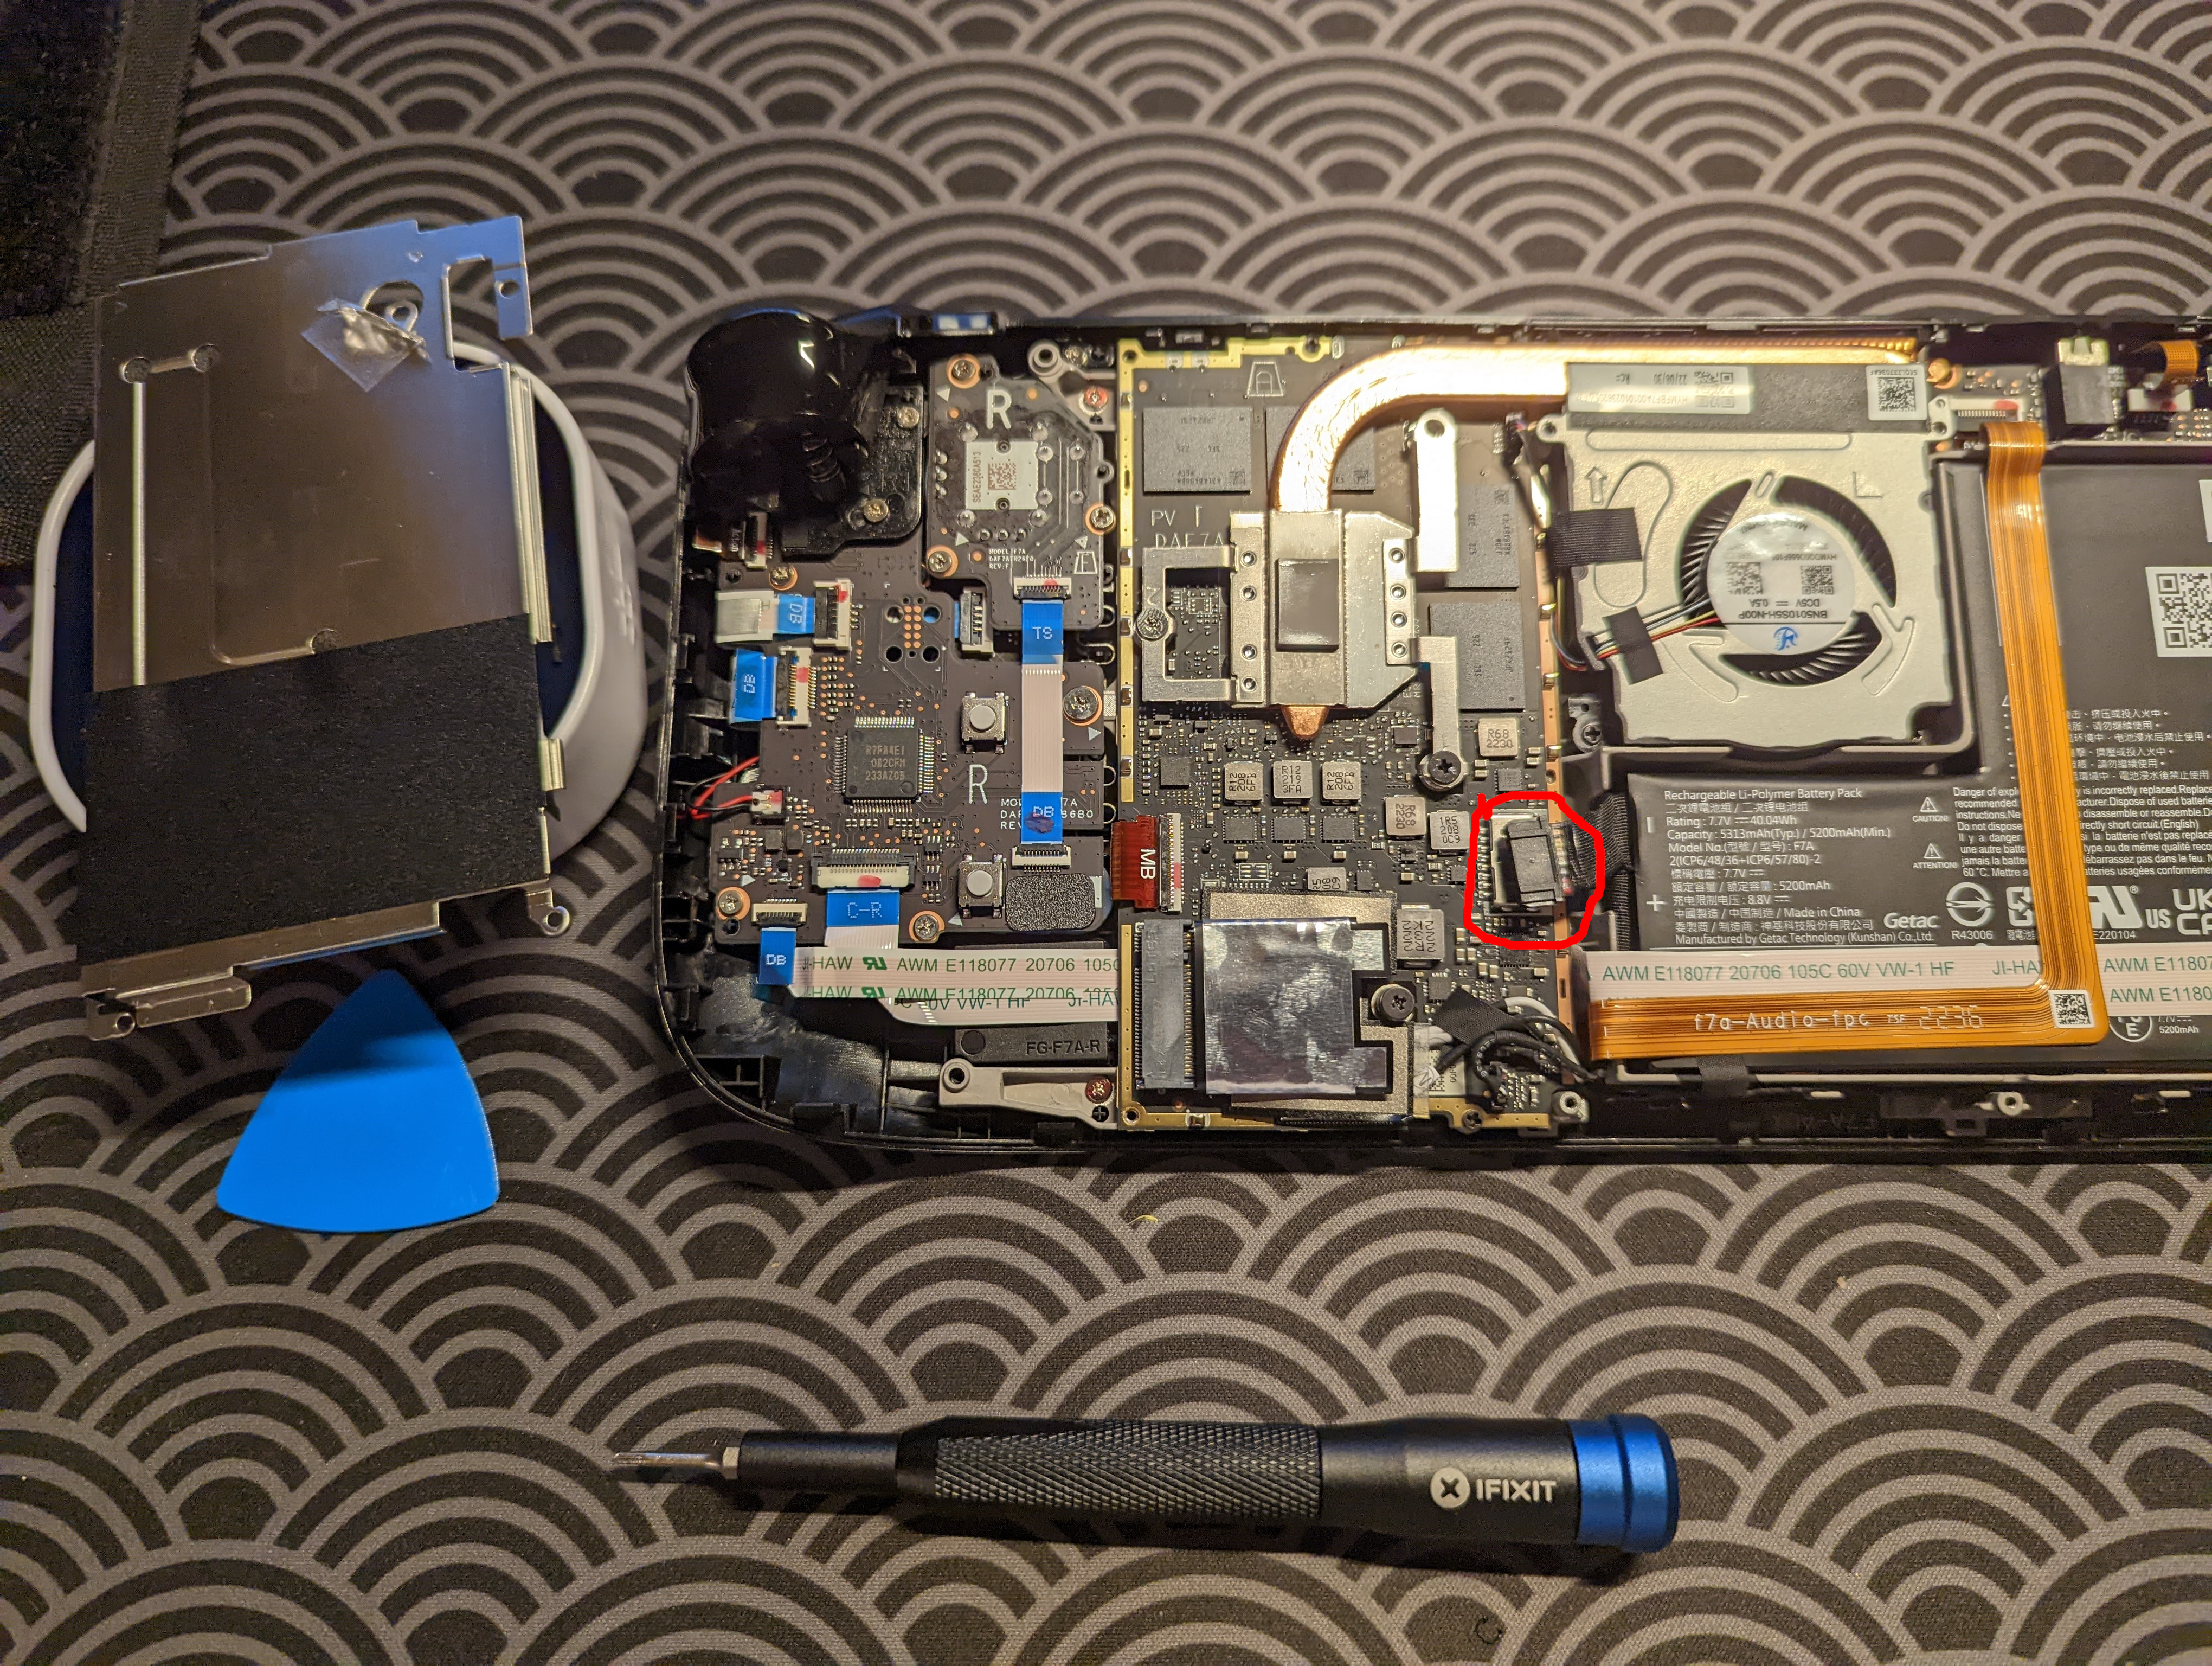
Battery
The TU40 does not have reverse voltage protection, so make sure the battery is connected with the correct polarity. Purchasing batteries from a different vendor, such a Amazon, might mean that you have to manually reverse the polarity of the battery.
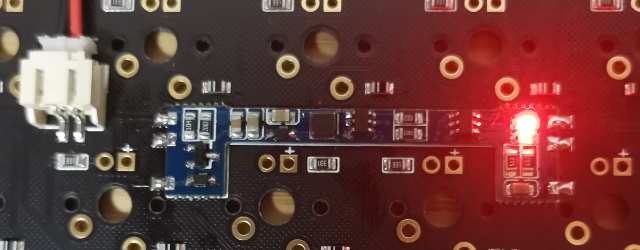
The TU40 PCB has a charging board located next to the battery holder (it’s the top left side of the keyboard). When the red light is on, the battery is charging.
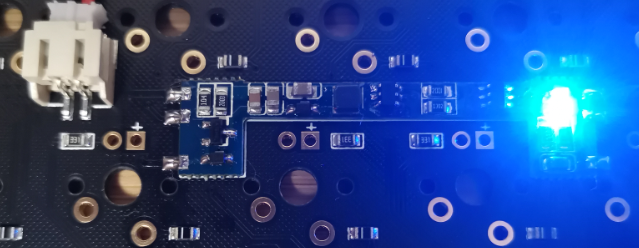
When the blue light is on, the battery is fully charged.
2.4 GHz
2.4 G is only available on TU keyboards that possess the 2.4 G wireless module. Enabling the 2.4 G mode requires the keyboard to be unplugged. Otherwise, the keyboard will operate in wired mode. 2.4 G-capable keyboards will have come with a USB adapter that the keyboard was already paired with at the factory. If for some reason, the USB adapter is not paired with the keyboard, there are two ways of pairing the keyboard with 2.4 G:
- With removing the battery
- Unplug the keyboard data cable, remove the keyboard battery, remove the USB adapter, and keep the PCB switch on.
- Insert the keyboard data cable, open the driver software, and click
eliminate pairingsunder the 2.4 G module permission management on the wireless menu. The status bar on the bottom left corner will pop up to show that the pairing was successfully cleared. - Unplug the keyboard data cable, insert the USB adapter into the computer, install the battery, and click any button on the keyboard until the computer displays a button trigger to complete the pairing.
- Without removing the battery
- Unplug the keyboard data cable, remove the USB adapter, keep the PCB switch on, and do not bother removing the battery.
- Insert the keyboard data cable, open the driver software, and click
eliminate pairingson the wireless menu page. - Unplug the keyboard data cable, turn off the PCB switch, insert the USB adapter into the computer, turn on the PCB switch, and then click any key on the keyboard until the computer displays a key trigger to complete the pairing.
Bluetooth
The Bluetooth section applies to the Bluetooth version of the wireless keyboard. Bluetooth connection requires the keyboard to be unplugged from the computer. Otherwise, the keyboard will function in wired mode. There are two indicators next to the Bluetooth module, one red and one blue. Their meanings are as follows:

If the keyboard is in the broadcast state and does not receive a connection request within 180 seconds, it will automatically enter the sleep state. If the keyboard is in the reconnect state for 30 seconds and fails to connect to the host, it will automatically enter the sleep state. If the keyboard is in sleep state, press the default ESC button to exit the sleep state, and the keyboard will automatically enter either the broadcast state or the connection state, according to the last pairing information.
The Bluetooth version of the TU40 can store the information of up to 3 host devices, and can switch between these devices. The driver software provides key values for switching between the 3 Bluetooth host devices:
Click the desired Bluetooth device button to switch to the desired host device. If the desired host device is not already bound to the keyboard, the keyboard will enter the broadcast state. Otherwise, it will enter the reconnect state.
To pair a new device, press and hold a key with the Bluetooth value, until the red light flashes slowly. It will force the corresponding channel of the keyboard to enter the broadcast state, and the new device will be paired once the host device agrees to the connection.
If the host device has been connected to the keyboard before, and still has the keyboard pairing information, but the keyboard has since deleted the host device information, the keyboard and host device will not be able to pair. In these conditions, the host device must delete the keyboard pairing information, in order to connect successfully.
Unifying Bluetooth
![]() FYI
FYI ![]() A simple trick to make sure you’re not stuck on a layer, after hitting_
A simple trick to make sure you’re not stuck on a layer, after hitting_ LT_, is to make the target layer have no value assigned to the key that had the LT_ _value at the origin layer.
The Unifying Bluetooth section applies to the Unifying Bluetooth version of the keyboard. Its indicator light meanings are not too different from the regular Bluetooth keyboard’s indicator lights:

Like the Bluetooth version of the keyboard, if the keyboard is in the broadcast state and does not receive a connection request within 180 seconds, it will automatically enter the sleep state. If the keyboard is in the reconnect state for 30 seconds and fails to connect to the host, it will automatically enter the sleep state. If the keyboard is in sleep state, press the default ESC button to exit the sleep state, and the keyboard will automatically enter either the broadcast state or the connection state, according to the last pairing information.
Like the Bluetooth version of the keyboard, the Unifying Bluetooth version of the TU40 can store the information of up to 3 host devices, and can switch between these devices. The driver software provides key values for switching between the 3 Bluetooth host devices:
Click the desired Bluetooth device button to switch to the desired host device. If the desired host device is not already bound to the keyboard, the keyboard will enter the broadcast state. Otherwise, it will enter the reconnect state.
To pair a new device, press and hold a key with the Bluetooth value, until the red light flashes slowly. It will force the corresponding channel of the keyboard to enter the broadcast state, and the new device will be paired once the host device agrees to the connection.
If the host device has been connected to the keyboard before, and still has the keyboard pairing information, but the keyboard has since deleted the host device information, the keyboard and host device will not be able to pair. In these conditions, the host device must delete the keyboard pairing information, in order to connect successfully.
Setting up Unifying Bluetooth
Setting up Unifying Bluetooth requires downloading software. I haven’t actually tried the software myself, because my keyboard is regular Bluetooth, and not Unifying Bluetooth.
Press and hold the unifying button for 5+ seconds, until the indicator light on the keyboard enters the broadcasting state (slow blue flashes). Then, open the Unifying Bluetooth pairing tool, and insert the Union adapter. Then click the advanced button. Select the Unifying receiver of interest, click the pair new device button on the right, and the keyboard should automatically connect. If the pairing attempt fails, check if the keyboard went to sleep because the broadcast timed out.

My Personal Keymap
As of 2022-06-07, my keymap is as follows:
play/pause key activates LM4, when it’s held down. The left space activates LM3 when it’s held down. The right space activates LM2 when it’s held down. The enter key activates the right shift when it’s held down. .
cmd + shift + 4 ).
~, !, @ … ). The italicized keys on the second row (from the top) also activates the shifted symbols. So -, =, [, ], and \. The italicized key on the third row is still the Apple screenshot command (cmd + shift + 4 ), like it is for Layer 2.
BLE1 connection doesn’t work for me, so I took it off.
BLE1 connection doesn’t seem to work for me, so I took it off. I currently use Device 2 as my iPad, and Device 3 as my Macbook Pro.